As parents, we often find ourselves swept up in the joy of transforming our children into their favourite characters, especially for special occasions like Halloween or themed parties.
Lion makeup for kids is not just a fun way to embrace creativity but also an opportunity to create lasting memories together. I remember the first time I applied lion makeup on my child; the excitement in their eyes was priceless! If you’re wondering how to do lion makeup for kids, you’re in the right place.
The basic materials for the lion makeup are face paint in orange, yellow, brown, and black, a sponge, a brush (flat or pointed), and a stencil (optional).
The basic steps for the long makeup are:
- Base Coat: Apply a base coat of orange or yellow paint to the child’s face, covering the entire area where you want the lion’s face to be.
- Muzzle and Nose: Use a sponge to apply a lighter shade of orange or yellow to the nose and muzzle area.
- Mane: Apply a darker shade of orange or brown to the sides of the face, extending it down to the neck to create the mane. Use a sponge or brush for a more textured look.
- Details:
- Use a fine-tipped brush to add details like whiskers, a black nose, and eyes.
- You can use a stencil to create the eyes and nose for a more realistic look.
- Add a touch of black paint to the lower lip to create a lion-like mouth.
Learning these basic steps will prepare you further for the main steps you will come across in this guide. I will take you step-by-step through the process, ensuring that your little one looks as ferocious and adorable as they desire.
Lionmakeupp is an excellent choice because it allows for a blend of creativity and artistic expression. Whether your child wants to roar like a lion at a school play or look adorable at a birthday party, this makeup tutorial will help you achieve the perfect lion look.
Plus, it’s suitable for professionals and amateurs so that everyone can join the fun. Get ready to unleash your inner artist as we dive into the world of lion makeup for kids!
What is LionMakeupp for Kids?
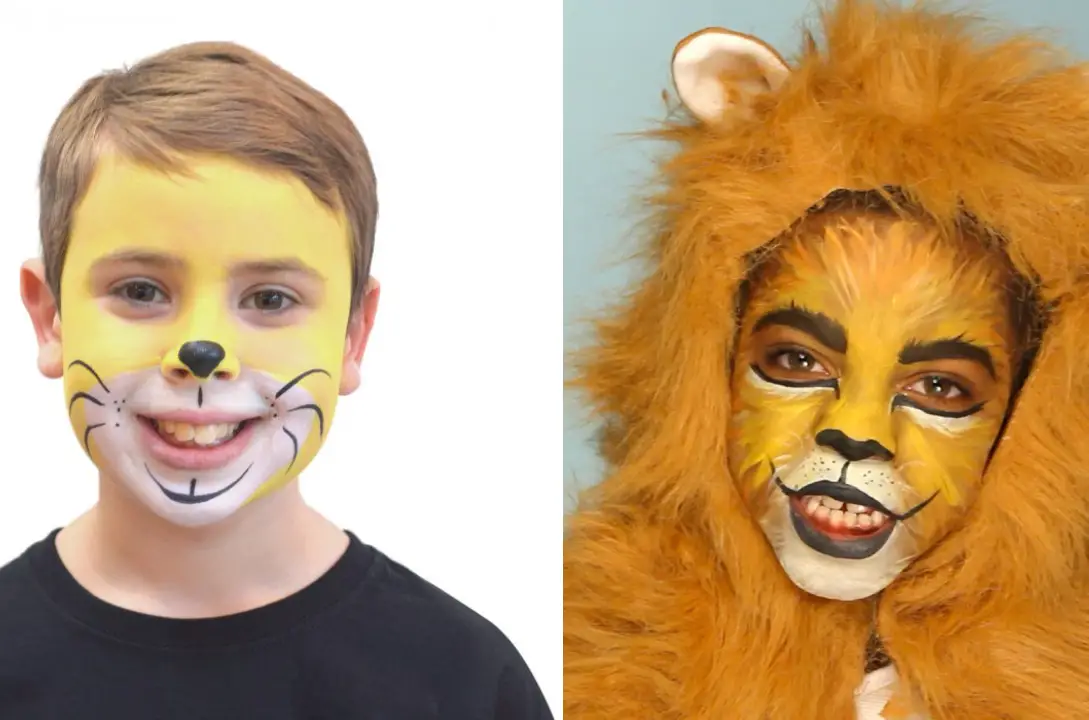
Lion makeup for kids is a fun and creative way to transform a child’s face into that of a lion, often used for themed parties, Halloween costumes, or school plays.
This makeup style typically includes vibrant colours like orange and yellow to represent the lion’s fur, with darker shades for details like the nose and whiskers.
The beauty of Lionmakeupp lies in its versatility; you can create anything from a simple lion face to a more elaborate design, complete with a fluffy mane and detailed features.
The Art of LionMakeupp
This type of makeup combines face painting techniques with creative design elements to give children a playful and imaginative look.
With the suitable materials and techniques, you can easily replicate the majestic features of a lion, allowing your child to step into the shoes—or rather, the paws—of the jungle king.
Creating a Memorable Experience
This is not only a fun activity, but it also promotes bonding and creativity between parents and children. As you work together, you’ll be painting a face and crafting memories that will last a lifetime.
This hands-on experience can ignite your child’s imagination, helping them explore their creative side while feeling empowered in their new role as a lion.
Why Kids Love LionMakeupp
Kids love lion make up for a multitude of reasons. Firstly, lions are often seen as powerful and majestic creatures, embodying strength and courage.
This appeal makes lion costumes and makeup popular for children who want to channel their inner beast. Additionally, the vibrant colours and fun designs associated with Lionmakeupp provide an exciting visual transformation that kids find irresistible.
The Power of Imagination
Children wearing lion makeup often feel like they are stepping into a different world. The roar of a lion becomes more than just a sound; it transforms the character into one full of life and personality. This imaginative play allows kids to explore different roles, enhancing their creativity and social skills.
Celebrating Special Occasions
Lionmakeupp is particularly popular during Halloween and other festive occasions. Children often seek out fun and eye-catching costumes, and what better way to stand out than by transforming into a lion? This contagious enthusiasm makes it a favourite among parents who want to see their kids fully engage in the event’s spirit.
Benefits of Doing LionMakeupp with Kids
Engaging in lion makeup with your children has a plethora of benefits that go beyond just looking good. It can enhance creativity, boost confidence, and even serve as a teaching moment.
Encouraging Creativity
Creating a lion look is an excellent way to encourage creativity in children. They can express themselves through colours and designs, allowing them to explore their artistic abilities. It’s a wonderful opportunity to discuss colour theory, patterns, and even the characteristics of lions in nature.
Building Confidence
When kids see their transformation into a lion, it can significantly boost their self-esteem. They learn to embrace their uniqueness and gain confidence in their appearance.
This newfound confidence can extend beyond makeup, helping them tackle challenges in other areas of life, whether in school or social settings.
Creating Lasting Memories
Working together on a lion makeup project allows quality bonding time between parents and children. Whether you’re laughing at the occasional smudge of paint or celebrating a job well done, these moments create lasting memories that your child will cherish. The joy and excitement of seeing themselves in the mirror as a lion can be incredibly fulfilling for kids.
Materials Needed
Gathering suitable materials is essential before you embark on your lion makeup adventure. Here’s what you’ll need:
Face Paint (Orange, Black, White, Brown)
Choosing high-quality, non-toxic face paint is crucial for safety and achieving the best results. You’ll need:
- Orange: For the base of the lion’s face and mane.
- Black: For detailing features like the nose and whiskers.
- White: To add highlights around the eyes and muzzle.
- Brown: For shading and depth in the mane and facial features.
Brushes (Flat, Round, Angled)
Different brush types will help you achieve various effects. Here’s what to have on hand:
- Flat Brush: Apply the base coat quickly.
- Round Brush: Ideal for detailing, such as whiskers and eyes.
- Angled Brush: Useful for creating defined lines and shapes.
Sponge
Amakeupp sponge is invaluable for smoothly applying and blending the base coat. Make sure to use a clean sponge for hygiene purposes.
Water
You’ll need water to wet the face paints and clean brushes as you go. Ensure the water is clean and accessible.
Towel
Keep a towel handy for spills or to wipe off excess paint. It’s also helpful for cleaning brushes between colours.
Step-by-Step Guide On How to Do LionMakeupp for Kids
Now that you have all your materials, let’s dive into the step-by-step tutorial on how to make makeup for kids. Follow these detailed instructions to ensure a successful application.
Preparing the Face
Before applying makeup, ensure the child’s face is clean and free from oils or dirt. A clean canvas helps the makeup adhere better and last longer.
- Clean the Face: Wash the child’s face with a gentle cleanser. Pat it dry with a towel.
- Moisturize (Optional): If your child has sensitive skin, consider applying a light moisturizer to prevent irritation. Allow it to absorb fully before moving to the next step.
Applying the Base Coat
Once the face is prepared, it’s time to apply the base coat. Here’s how:
- Wet Your Sponge: Dampen the makeup sponge with water. Squeeze out any excess moisture.
- Load the Sponge with Orange Paint: Dip it into the orange face paint, ensuring it’s evenly coated.
- Apply the Base Coat: Start at the forehead and gently dab the sponge onto the skin, moving down to the cheeks and chin. Be sure to cover the entire face, avoiding the eye area.
- Even Out the Color: Using the sponge to blend the paint ensures no streaks or uneven patches.
Creating the Muzzle
The muzzle is a defining feature of the lion look, so let’s create that now.
- Switch to Brown Paint: Pick up some brown face paint using a round brush.
- Outline the Muzzle: Starting from the centre of the face, draw a rounded shape for the muzzle that extends from one side of the mouth to the other.
- Fill in the Muzzle: Use the flat brush to fill in the outline you’ve created with the brown paint.
Adding the Mane
The lion’s mane adds depth and character to the overall look. Here’s how to do it:
- Using a Flat Brush: Load your flat brush with orange and brown paint.
- Create the Mane: Starting from the top of the head, draw small, pointed strokes to create the look of a fluffy mane. Vary the colours for a more realistic effect, blending orange and brown as you go.
- Extend the Mane: Make sure the mane extends around the sides of the face, creating a complete lion look.
Detailing the Face (Whiskers, Nose, Eyes)
Finally, it’s time to add the finishing touches to make the lion makeup pop.
- Whiskers: With a fine round brush, use black paint to draw three long whiskers on either side of the muzzle. These should extend outwards for a more dramatic look.
- Nose: Paint a small, rounded black nose at the centre of the muzzle.
- Eyes: For the eyes, use black to outline the eye shape and white to add highlights for a more vibrant look.
- Finishing Touches: Use the sponge to blend harsh lines and ensure the colours flow seamlessly.
Tips and Tricks
To achieve the best results while doing lion makeup for kids, consider the following tips and tricks:
Using the Right Colors
Selecting the right shades is essential for a successful lion look. While orange and brown are typical colours, don’t be afraid to experiment with different shades to match your child’s preferences.
- Test Before Applying: Always test the paint on a small skin area to check for allergies or reactions.
- Blend Wisely: Blend the colours to create depth and dimension in the mane and facial features.
Blending Techniques
Blending is critical to achieving a polished look. Here are some techniques to master:
- Use a Wet Sponge: For smoother blends, keep your sponge damp. This helps to soften the paint and create a more natural transition between colours.
Layering Colors
Layering is essential for achieving depth in your lion makeup. Here’s how to effectively layer colours:
- Start Light, Go Dark: Begin with lighter colours like orange as your base, then add darker colours like brown and black for shadows and details.
- Build Gradually: Apply a light layer first and allow it to dry before adding more paint. This helps prevent smudging and allows for better control over the final look.
Cleaning Up the makeup
After you’ve created your lion masterpiece, you must know how to clean up properly. Here are some steps for effective cleanup:
- Use Makeup Remover: To remove face paint, opt for a gentle makeup remover or baby wipes. This helps prevent irritation and ensures the makeup comes off easily.
- Wash with Soap and Water: After using makeup remover, wash the face with mild soap and water to remove any remaining residue.
- Moisturize: Finish with a light moisturizer to keep the skin hydrated, mainly if any irritation occurs from the face paint.
Making the Makeup Last Longer
To ensure that your lion makeup stays vibrant throughout the day, consider these tips:
- Set with Powder: After applying the paint, lightly dust the face with translucent powder. This helps to absorb excess moisture and set the makeup.
- Avoid Touching the Face: Encourage your child not to touch their face, which can smudge the makeup.
- Choose Quality Products: Invest in high-quality face paints that last longer and quickly remove.
Conclusion
Creating lion makeup for kids can be a delightful experience that allows for creativity and bonding. As you embark on this fun adventure, remember to keep safety in mind, use quality materials, and enjoy the process together. Here’s a quick recap of your steps to achieve a stunning lion look.