Have you ever wondered how to bring the Joker’s iconic grin to life for your child’s next Halloween party or costume event? The Joker’s makeup is both bold and captivating, making it a fantastic choice for kids who want to stand out.
The Joker is a character known for his menacing appearance and often violent behaviour. Applying such makeup to a child could be inappropriate and potentially frightening to others.
If you’re looking for a child-friendly Halloween costume idea, consider characters that are known for being positive and friendly.
If you insist on still learning how to make the joker makeup, I’ll cover everything from materials to safety tips and give you expert advice to ensure you get the best results.
Materials You Need For The Joker Makeup
Before we start, it’s crucial to gather all the right tools and materials to ensure a smooth and fun process. Using high-quality products can make all the difference in achieving a flawless Joker look for your child. Here’s what you’ll need:
- Face Paint or Makeup Kit: Opt for kid-friendly, non-toxic face paints. Look for colours like white, green, black, and red. These are the base colours for the Joker makeup.
- Brushes and Sponges: For smooth application, you’ll need a variety of brushes (fine and wide) and a makeup sponge. A thin brush will help you draw detailed lines, while a wider brush or sponge will allow for faster coverage on larger areas like the face.
- Stencils (Optional): If you’re not confident about freehand drawing, stencils can be a lifesaver for the Joker’s bold lines and iconic smile.
- Setting Powder: Setting powder locks everything in place and prevents smudging, ensuring the makeup lasts all day (or night).
- Makeup Wipes or Remover: Cleaning up is just as important as applying makeup. Make sure to have gentle makeup remover wipes or liquid remover to safely remove makeup after the event.
Having all these materials prepared ahead of time will make the process smooth, and you’ll feel ready to tackle each step confidently.
The Safety Steps You Need to Follow
When applying Joker makeup on kids, safety should be your top priority. Children’s skin is much more sensitive than that of adults, and using the wrong products can lead to irritation, rashes, or allergic reactions. Here’s what you need to keep in mind to ensure a safe and enjoyable experience:
1. Choose Non-Toxic, Hypoallergenic Products
Always opt for non-toxic and hypoallergenic face paints or makeup kits specifically designed for children. These products are generally gentler on the skin and free from harmful chemicals, which makes them safer for prolonged use. Avoid regular makeup, as it may contain ingredients that could irritate your child’s skin. Look for brands that are dermatologically tested and recommend them for sensitive skin.
2. Conduct a Patch Test
Even with kid-friendly products, it’s essential to test for potential allergies. A patch test is a simple way to check if your child’s skin might react to the makeup. Apply a small amount of the face paint on a less visible area, like the inside of the arm, and wait for at least 24 hours. If there’s no redness, itching, or swelling, you’re good to go.
3. Avoid the Eye Area
The skin around the eyes is delicate, and it’s best to keep this area as makeup-free as possible, especially when using solid colours like black or red. If you must apply makeup near the eyes (e.g., for the Joker’s exaggerated eye makeup), make sure to use products that are safe for that area. It’s a good idea to let your child close their eyes when working on that part of the face and be extra gentle with the brush or sponge.
4. Use Clean Tools
Make sure that all your brushes, sponges, and other tools are clean before you start applying the makeup. Dirty tools can harbour bacteria that may lead to skin infections or breakouts. Clean your tools with soap and water before use, and sanitize them after each session.
5. Don’t Use Glitter Near the Eyes
While glitter can add some sparkle to the look, it’s better to avoid using it near your child’s eyes. Glitter particles can quickly get into the eyes and cause irritation or even injury. If you want to add some sparkle, use cosmetic-grade glitter that is safe for use on the skin, and apply it sparingly away from the eyes.
By keeping these safety precautions in mind, you’ll ensure that your child’s Joker makeup experience is not only fun but also safe.
Step-by-Step Tutorial On How to Do Joker Makeup on Kids
Now that you’ve got your materials ready and safety covered, it’s time to dive into the exciting part—the step-by-step process of creating Joker makeup on kids! Below is a detailed guide that even beginners can follow to achieve a stunning result.
1. Prep the Skin
- Step One: Start by cleansing your child’s face with a mild cleanser. This ensures that the skin is free of dirt, oil, or residue that could prevent the makeup from adhering correctly.
- Step Two: Apply a lightweight, hypoallergenic moisturizer. This step is crucial to creating a smooth base and prevents the skin from drying out under the makeup.
- Step Three: If your child’s skin is susceptible, consider applying a thin layer of face primer, which will act as a barrier between the skin and the makeup.
2. Apply the White Base
- Step One: Using your makeup sponge, apply white, non-toxic face paint evenly over your child’s face. This will form the foundation for the Joker’s ghostly pallor.
- Step Two: Blend the edges around the hairline, jawline, and ears so there aren’t any harsh lines. This gives the makeup a seamless, professional look.
- Step Three: Apply a second layer of white face paint for a more opaque look if needed, but let the first layer dry completely before adding more. You can speed up the drying process by gently fanning the face with a piece of paper or cardboard.
3. Define the Eyes
- Step One: Take a small, fine-tipped brush and use black face paint to outline and fill in the areas around your child’s eyes. The Joker’s eyes are one of the most distinctive features, so you’ll want to create bold, exaggerated shapes.
- Step Two: Draw two upward slanting ovals around the eyes, extending slightly beyond the eyebrows and down towards the cheeks. Think of it as a messy, somewhat asymmetrical “mask” over the eyes.
- Step Three: For a more dramatic effect, smudge the edges of the black paint to create a smudged, chaotic look, mimicking the Joker’s wild appearance.
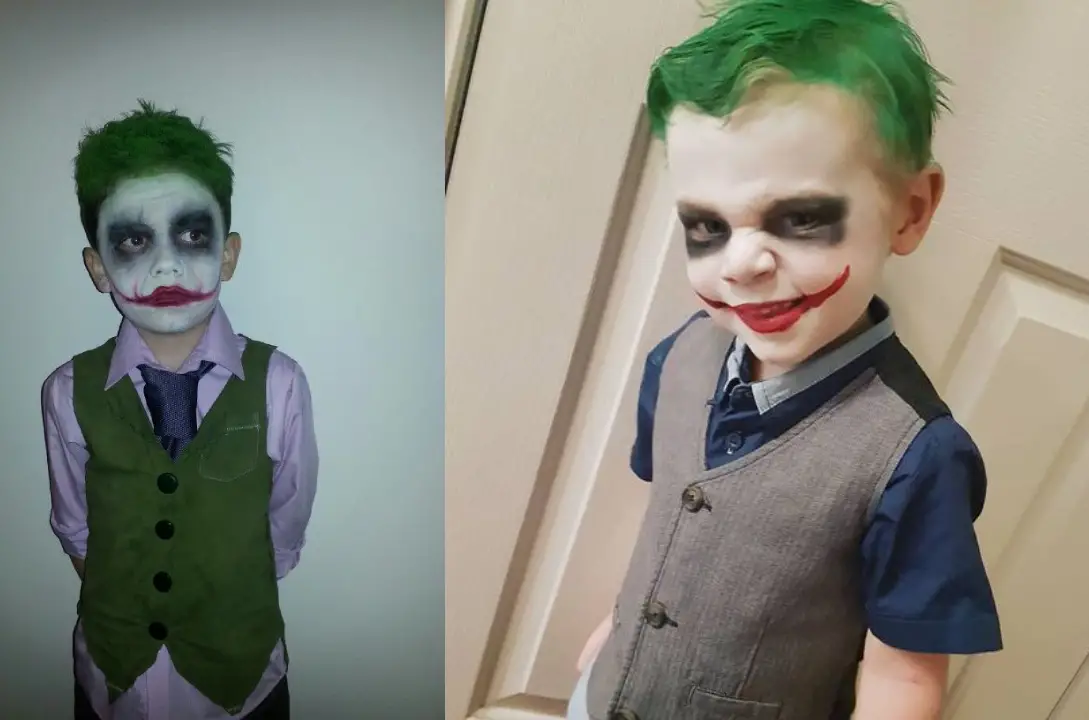
4. Add the Joker’s Signature Smile
- Step One: The Joker’s grin is his most recognizable feature. Use red face paint and a thin brush to outline an exaggerated smile that stretches from the edges of the lips to the cheeks.
- Step Two: Make the smile uneven and slightly jagged to give it that iconic, sinister feel. After outlining the smile, fill it in with more red paint.
- Step Three: For a scarier effect, add thin black lines inside the smile to mimic scars or stitches. This gives the Joker’s makeup an extra level of detail and realism.
5. Finish with the Green Hair
- Step One: If you want to take the Joker makeup to the next level, consider adding green hair spray to your child’s hair (if applicable). Simply cover their face with a towel to protect the makeup and lightly spray the hair, focusing on the front strands.
- Step Two: You can style the hair in messy waves to match the Joker’s untamed appearance.
Tips You Should Apply for a Professional Finish
Now that you’ve mastered the basic steps let’s take a look at some insider tips and tricks to make your Joker makeup on kids look even more polished and professional. Whether you’re aiming for a clean version of the Joker or a more chaotic, smudged look, these tips will help you achieve the best results.
1. Use Stencils for Precise Lines
- If you’re worried about getting the Joker’s smile or eyes just right, stencils can be your best friend. You can either buy ready-made face paint stencils or make your own by cutting out shapes from a piece of thin cardboard. Place the stencil over your child’s face, hold it in place, and gently dab the paint inside the cut-out areas for perfect shapes every time.
2. Blend Colors for Realism
- Joker makeup doesn’t need to be flawless—after all, the character himself is known for a messy, imperfect look. However, blending certain areas, like the eyes or the smile, can make the makeup appear more realistic and three-dimensional. For example, after applying the black around the eyes, use a dry brush or sponge to lightly smudge the paint outward, creating a smoky, worn-out effect.
- You can also do this with the red paint around the smile. Blending the edges slightly will give the makeup a more natural transition into the skin, making it look less like a painted-on mask.
3. Layer Your Paints
- One common mistake people make with face paint is applying too much at once. If you want to achieve vibrant colours that last throughout the day, it’s better to use several thin layers rather than one thick one. This is especially important with the white base and the red smile. Allow each layer to dry thoroughly before adding the next to prevent the paint from cracking or smudging.
4. Use Makeup Setting Spray
- To ensure that your child’s Joker makeup stays in place all day long (especially during active play), apply a makeup setting spray after you’re done painting. This is an extra step, but it will lock everything in and prevent the makeup from smearing. Just make sure to use a setting spray that’s safe for kids and gentle on the skin.
5. Involve Your Child in the Process
- For parents doing Joker makeup on their kids, involving your child in the process can make the experience even more enjoyable. Let them help pick out colours or hold a mirror so they can see the progress. Not only will this make them feel involved, but it will also keep them entertained during the painting process.
6. Perfecting the Joker’s Hair
- If you don’t want to use hair dye or coloured spray, you can use green hairspray designed for kids. Alternatively, you can use a wig if you want a more temporary option or if your child has short hair that doesn’t hold colour well.
- If your child has long hair, tousle it up with a bit of hairspray to give that chaotic Joker vibe. The messier, the better!
How to Safely Clean and Remove Joker Makeup
Once the fun is over and it’s time to remove the Joker makeup, you’ll want to ensure that the process is both gentle on your child’s skin and effective. Removing face paint can sometimes be a challenge, especially when using vibrant colours like red and black. Here’s how to safely and efficiently clean up after the fun day of Halloween, parties, or playtime:
1. Use a Gentle Makeup Remover or Baby Wipes
- Start with a gentle makeup remover that is safe for kids. If you don’t have one specifically for children, baby wipes, which are designed for sensitive skin, can also do the trick.
- Avoid using harsh scrubs or adult makeup removers that contain strong chemicals. These can irritate your child’s skin, especially after wearing makeup for several hours.
2. Break Down the Makeup with Oil
- For stubborn makeup, predominantly black and red face paint, a little bit of oil can help break it down. Coconut oil or olive oil works wonders for loosening up the makeup so it can be wiped away easily. Apply a small amount of oil to a cotton ball or soft cloth and gently rub it over the painted areas.
- After the makeup has been broken down with the oil, use a damp cloth to wipe it off. This will help lift most of the face paint without excessive scrubbing.
3. Wash the Face with Mild Cleanser
- Once the bulk of the makeup has been removed, follow up with a mild facial cleanser suitable for kids. This will help remove any remaining residue and clean the skin thoroughly.
- Gently massage the cleanser into the skin in circular motions, focusing on areas that have the most makeup. Rinse the face with lukewarm water and pat it dry with a soft towel.
4. Hydrate the Skin
- After removing makeup, it’s important to rehydrate your child’s skin. Even the gentlest face paints can sometimes leave the skin feeling dry. Apply a light, kid-friendly moisturizer to restore moisture and keep the skin soft and healthy.
- You can also use an aloe vera gel if the skin appears a bit irritated from the makeup application. Aloe is soothing and helps reduce any redness or dryness.
5. Clean Your Tools
- Don’t forget to clean the brushes, sponges, and stencils you used for applying the makeup. Wash them thoroughly with warm water and soap to remove any leftover paint and bacteria. Allow them to air dry before storing them for future use.
By following these steps, you can ensure that your child’s skin stays healthy and happy, even after a full day of wearing Joker makeup.
Conclusion
Creating the Joker makeup for your kids is not only a fun and engaging activity but also a great way to let their imagination run wild, especially for events like Halloween, costume parties, or themed playdates. Whether you’re a makeup pro or a complete beginner, this guide offers easy steps and pro tips to help you achieve the best results.
From prepping your child’s skin to applying the perfect white base, outlining those iconic black eyes, and finishing it off with the Joker’s signature smile, you now have all the tools and knowledge you need. The key is to enjoy the process, be creative, and ensure your child is comfortable every step of the way.
As you go through the process, remember to use kid-friendly, non-toxic materials and follow safety precautions. Involving your child in the makeup process can make it even more fun, and with the right tips and tricks, you’ll be able to create a professional-looking Joker face that will make them the star of any party.
Once the fun is over, clean-up doesn’t have to be a hassle if you follow the gentle removal techniques outlined in this post. Hydrating and moisturizing your child’s skin afterwards is just as essential to ensure their skin remains soft and irritation-free.