ransforming your child’s face into an adorable fox is one of the most delightful ways to bring out their playful side, whether it’s for Halloween, a costume party, or just some fun at home.
So, if you’re asking, “How do I make my kid’s face look like a fox?” let me assure you: it’s easier than you might think! With a few simple steps, the right supplies, and a little patience, you’ll have your little one looking like a cute, curious fox in no time.
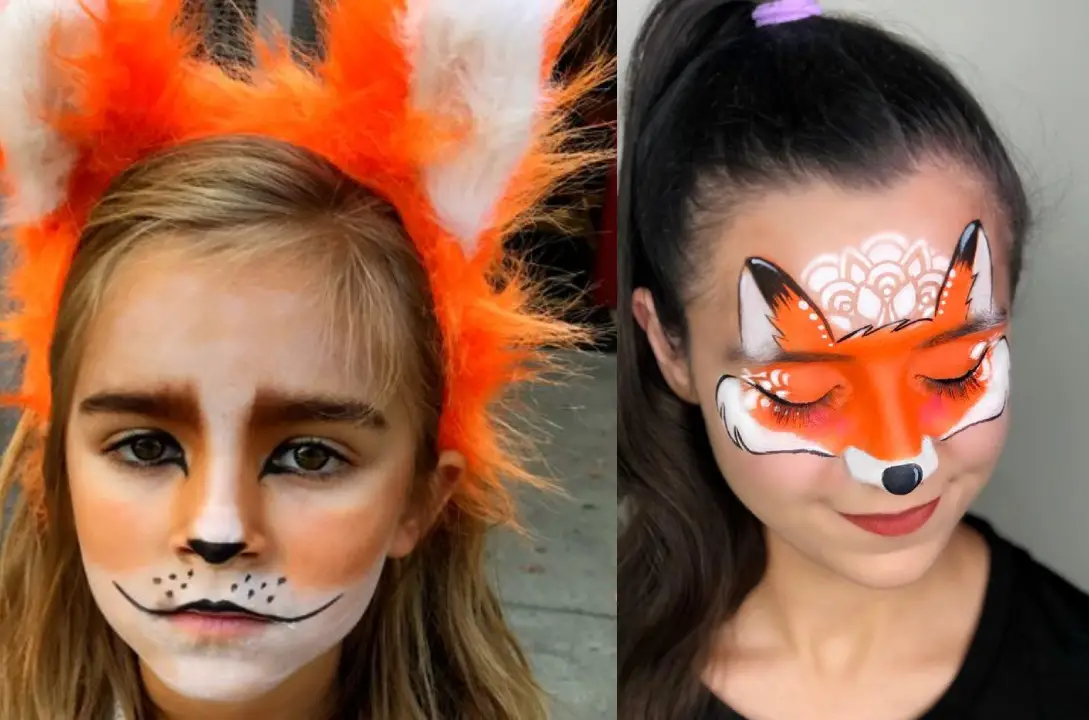
To make your kid look like a fox, apply white face paint around the eyes and mouth, orange paint on the cheeks and forehead, and black paint for the nose and whiskers.
If you are able to do it correctly, you already acomplished the first step. Now i will further walk you through everything you need to know to create a perfect fox face paint for kids, whether you’re a professional artist or a parent doing makeup for the first time.
I’ll cover why a fox design is such a great choice, list the supplies you’ll need, and provide a simple, step-by-step guide to achieving the cutest fox look. https://kidsbeautyexpert.com/how-to-do-sea-otter-makeup-on-your-kids/
Why a Fox Face Paint is Perfect for Your Little One
Choosing a fox face paint look for your child is more than just about aesthetics—it’s about tapping into the whimsical, playful energy that foxes naturally embody.
With their bright orange fur, black noses, and clever expressions, foxes are both cute and a little mysterious, capturing the perfect balance for a child’s costume.
Not only is a fox face paint look easy to achieve with minimal supplies, but it’s also versatile, lending itself to both simple designs for younger children and more intricate, realistic details for older kids or special events.
Foxes have a universal appeal that transcends different cultures and age groups. From storybooks to animated films, kids are often already familiar with fox characters, which adds to the excitement when they get to embody one themselves.
And let’s face it—fox face paint is fun for parents too! It’s simple enough for anyone to learn, so even if you’ve never held a paintbrush before, don’t worry. By following this guide, you’ll be able to create an adorable look that your child—and everyone who sees it—will love.
Gather Your Supplies: A Simple Checklist
Before diving into the face painting process, make sure you have all your supplies ready. Here’s a list of everything you’ll need to create a flawless fox face paint for kids:
- Orange Face Paint – This is the primary color for a fox look. Opt for a non-toxic, kid-safe face paint, which you can find at most costume or art stores.
- White Face Paint – For the fox’s muzzle, cheeks, and accents, white is essential to add depth and cuteness.
- Black Face Paint or Eyeliner – This is used to draw the fox’s nose, whiskers, and eye details. Make sure it’s waterproof and hypoallergenic.
- Face Brushes or Sponges – Brushes give you control over lines and shapes, while sponges help with even color application.
- Setting Spray or Powder (Optional) – A setting spray can help keep the paint from smudging, especially if your child will be wearing it for a while.
- Baby Wipes or Makeup Remover – These are helpful for cleaning up any smudges or mistakes quickly.
Once you’ve gathered these supplies, find a well-lit area, and set up a mirror so your child can see the progress. A small towel or apron can also help protect their clothes during painting.
Step-by-Step Guide to a Flawless Fox Face Paint
Now that you have your supplies ready, let’s get started on transforming your child into a cute fox! This step-by-step guide will show you how to create the classic fox features, including the orange face, white muzzle, and playful black details. Follow each step carefully, and remember, practice makes perfect!
Step 1: Base Layer with Orange Paint
Start with the main color of the fox’s face: orange. Dip your sponge into the orange face paint and apply it evenly across your child’s cheeks, forehead, and chin. Leave a little space around the mouth and nose area, as this is where we’ll apply the white paint later.
- Pro Tip: Use a dabbing motion with the sponge rather than swiping. This helps create an even coat and prevents streaking. If the orange is too faint, let it dry for a few seconds, then apply a second layer.
Step 2: Create the Fox Muzzle with White Paint
Next, we’ll add the white muzzle area to give the fox that iconic look. Using a clean brush or sponge, apply white face paint in a circular area around the nose and mouth. Extend it slightly over the top lip and down onto the chin to create a cute, rounded shape.
- Pro Tip: If you want to add extra cuteness, you can also apply some white above each eyebrow. This gives a softer, more cartoon-like appearance and adds more dimension.
Step 3: Add White Accents on the Cheeks and Inner Ears
After completing the muzzle, add small white triangles just above the orange base on the cheeks to mimic fur and create dimension. Use a fine brush to ensure these accents stay crisp and defined. You can also add white paint on the eyelids or just under the eyes to make them pop. For the inner ears, if you want, you can lightly dab a bit of white paint on each side of the forehead for an adorable finishing touch.
- Pro Tip: Use a smaller brush for these areas to keep lines clean and precise. This makes the fox design look more polished and professional.
Step 4: Define the Nose and Whiskers with Black Paint
Using black face paint or eyeliner, draw a small triangle at the tip of your child’s nose and fill it in. This will create the fox’s nose. Then, add three small whisker dots on each side of the upper lip, extending outwards with three to four short whisker lines.
- Pro Tip: Use a thin brush for the nose and whiskers to make sure they’re clean and don’t smudge. If you’re using eyeliner, opt for a waterproof version so it holds up longer.
Step 5: Outline the Eyes and Add ‘Foxy’ Eyebrows
For the finishing touch on the eyes, apply a thin line of black face paint or eyeliner along the upper lash line, extending it slightly outward for a subtle, foxy look. This gives the face a bit of extra expression and emphasizes the eyes. Draw two small, slightly curved black lines above each eye to create the ‘eyebrows.’
- Pro Tip: If your child is sensitive around the eyes, skip the eyeliner and focus on adding the ‘eyebrows’ only. You can also add small black dots to the edges of the white cheek area for extra detail.
Step 6: Set the Face Paint with Setting Spray or Powder
To ensure the face paint stays in place, especially if it’s for a party or trick-or-treating, use a setting spray or lightly dab translucent setting powder over the paint. This will help prevent smudging and keep the colors vibrant throughout the day or evening.
- Pro Tip: Be gentle with setting spray or powder to avoid irritating your child’s skin.
And that’s it! You now have a beautifully painted fox face that’s sure to make your child the star of any event.
Tips and Tricks for a Realistic Fox Look
Creating a fox face paint that looks realistic (and cute) takes a few extra touches that can really elevate the final look. While the steps above give a solid base, here are some insider tips to take your fox face paint to the next level. These tips are especially helpful if you’re aiming for a realistic look for a costume party, Halloween event, or photo shoot.
1. Layering for a Textured Fur Effect
Adding a little bit of texture can give the fox look a more three-dimensional effect, mimicking real fur. After applying the base orange paint, use a small brush and add slightly darker orange or brown strokes along the edges of the face, around the cheeks, and forehead. Lightly flick the brush outward to create a feathery, fur-like effect.
- Pro Tip: You can blend in both orange and brown in light strokes for a more realistic effect, focusing on areas like the cheeks and sides of the forehead.
2. Blend the White and Orange Seamlessly
To make the fox face paint look more natural, gently blend the borders between the white and orange areas. Using a clean sponge or brush, lightly tap along the edges where the two colors meet, softening any harsh lines. This blending technique helps the face paint look polished and less like a mask.
- Pro Tip: For an extra soft look, use a makeup sponge with a bit of translucent powder to tap along the blended areas. This will help set the paint and create a smooth transition.
3. Use Eyeshadow for Shading and Depth
Adding some shading with a matte brown or orange eyeshadow can add depth to the face paint. Apply eyeshadow around the cheek area, near the temple, and around the forehead to create a natural contour. This is especially effective for older kids or if you’re aiming for a more realistic, mature fox look.
- Pro Tip: Use a fluffy brush to lightly apply the eyeshadow. You want it to blend softly into the face paint without looking too heavy. Matte eyeshadows work best as they don’t reflect light.
4. Add a Small White Highlight on the Nose
For a touch of extra realism, add a tiny dab of white paint on the top of the black nose. This creates the illusion of a light reflection, making the nose look shiny and more lifelike.
- Pro Tip: Be careful to keep this dot small and centered—it’s a small touch, but it can make a big difference!
5. Experiment with Faux Fur Ears or Accessories
To complete the look, consider adding a pair of faux fur fox ears or even a matching tail. These accessories can be found online or at most costume stores and can make the fox transformation feel more complete. Choose ears that match the orange and white tones of the face paint for a seamless look.
- Pro Tip: If you want a DIY option, you can make fox ears by cutting out felt triangles and attaching them to a headband. Add a bit of fluff with white or orange felt in the center of each triangle for an adorable, homemade touch.
6. Practice Patience with Young Kids
Face painting young children can be a bit challenging since they may not want to sit still for long. Take breaks between each step if needed, and keep the energy light and fun. Offering them a small mirror to see their face at different stages can help them stay engaged and excited about the process.
- Pro Tip: Keep some snacks or toys nearby to keep younger kids entertained while you’re working on detailed sections, like the nose and whiskers.
Frequently Asked Questions About Fox Face Paint
When it comes to face painting, especially for kids, many parents and beginners have similar questions. Below are some of the most frequently asked questions about creating a fox face paint look, along with practical answers to make the process easier. Whether you’re wondering about the best products to use or how to make the look last, these FAQs cover it all.
1. What Type of Face Paint Should I Use?
When choosing face paint for kids, always look for non-toxic, hypoallergenic, and water-based options. These types are generally safe for children’s sensitive skin, easy to apply, and quick to wash off. Brands like Snazaroo, Mehron, and TAG are widely recommended in the face-painting community because they meet these standards and offer vibrant, high-quality colors that last.
- Pro Tip: Always do a patch test on a small area of skin, like the wrist, 24 hours before applying the paint on the face. This ensures there’s no allergic reaction or irritation.
2. How Do I Remove the Face Paint?
Removing face paint is simple if you’re using water-based products. Start by wiping the face with a damp cloth or baby wipe to remove most of the paint. Then, use a gentle cleanser or makeup remover to clean any remaining residue, followed by rinsing with water.
- Pro Tip: Avoid scrubbing the skin, as this can cause irritation. Pat the skin dry afterward and apply a gentle moisturizer if needed.
3. How Long Does Fox Face Paint Last?
Face paint can last several hours if applied properly and if the child doesn’t touch their face too often. For extended wear, use a setting spray or translucent powder after completing the design. This will help keep the paint from smudging or fading, especially during events like Halloween parties or trick-or-treating.
- Pro Tip: Explain to your child that their face is “painted” and encourage them to avoid rubbing their face to make the paint last longer.
4. Can I Use Regular Makeup Instead of Face Paint?
Yes, you can use regular makeup, but keep in mind that not all makeup products are made for sensitive areas like the cheeks and forehead, especially for children. Eyeshadows, eyeliners, and lipsticks can work in a pinch but may not be as safe or as vibrant as face paint. Also, regular makeup doesn’t always blend or set as well for face painting purposes.
- Pro Tip: If you’re using regular makeup, choose hypoallergenic products designed for sensitive skin, and use a setting powder to reduce smudging.
5. How Do I Get My Child to Sit Still During Face Painting?
For younger kids, keeping them entertained during face painting can be challenging. Try setting up a fun environment by playing their favorite music, letting them watch a cartoon, or allowing them to look at a mirror to watch the progress. Sometimes, turning it into a game by asking them to “be still like a fox” can also help.
- Pro Tip: Break the process into small steps with mini breaks in between, especially if it’s a detailed design. Short breaks allow the paint to dry and prevent kids from feeling restless.
6. Can I Add Glitter to the Face Paint?
Yes! A touch of glitter can add a magical sparkle to the fox face paint, but make sure to use cosmetic-grade glitter, which is safe for the skin and eyes. Apply the glitter sparingly over the orange areas or cheeks for a subtle shimmer. Avoid using craft glitter, as it can be too abrasive for the face and isn’t safe for the skin.
- Pro Tip: If you want to apply glitter, use a small brush or your fingertip to dab a bit on each cheek, avoiding the eye area to prevent irritation.


