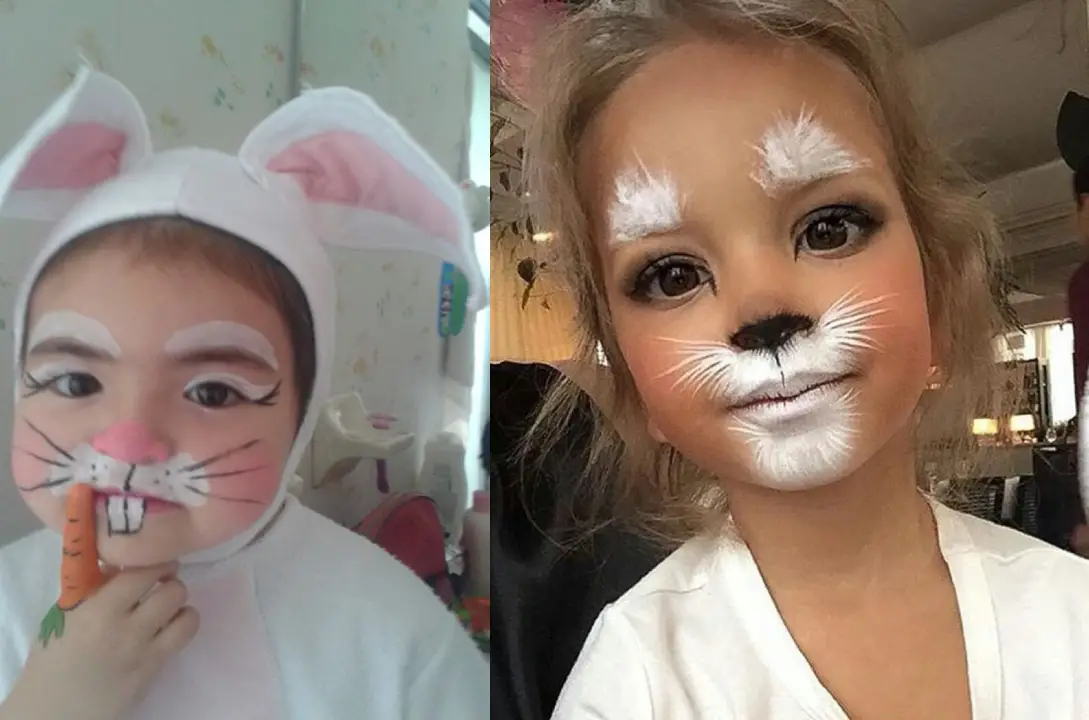
Have you ever seen your little one’s face light up after trying out a playful costume or fun makeup for a party? Bunny makeup is one of the most straightforward and adorable looks you can create for your child, whether it’s for Easter, Halloween, or just a fun day of play!
I remember trying this for the first time on my niece and realizing how much fun we both had — not to mention how cute she looked, bouncing around pretending to be a bunny!
So, how can you get that same perfect look without breaking a sweat? It is very simple and requires just a few processes to do. First, you need some materials and tools in order for you to get that done:
- White face paint
- Pink face paint
- Black face paint
- Paintbrushes
- Sponges
- Glitter (optional)
After getting this material ready, the basic steps for you to follow are outlined below:
- Base Coat: Apply a white base coat to the child’s face and ears. This will create a clean canvas for the other colors.
- Bunny Nose: Use a pink sponge to dab a small pink circle on the child’s nose to create the bunny’s nose.
- Whiskers: Use a fine-tipped brush and black paint to draw whiskers from the sides of the nose.
- Bunny Ears: Use a stencil or freehand to draw two pink triangles on the sides of the child’s head, representing the bunny’s ears.
- Inner Ears: Fill in the inner part of the ears with white paint to create a contrasting look.
- Details: Add optional details like black dots for the eyes or glitter for a sparkly touch.
So, with the above basic steps, you have completed the needed steps to do some basic bunny makeup. In order to make it look stunning, you need to read to the end of this guide.
The best part? It’s fun, easy, and perfect for any occasion. Plus, I’ll show you how to make it safe and enjoyable for both you and your child.
Gather Your Supplies
Before diving into the fun part, the actual makeup, let’s make sure you have everything you need. Trust me, the last thing you want is to be halfway through and realize you forgot an essential item! Whether you’re doing this for a birthday party or just because having the right tools will make the process smoother.
Here’s what you’ll need for a flawless bunny makeup:
- Face Paint or Child-Friendly Makeup: White, pink, and black are essential. If you’re doing this for a party, consider investing in face paints that are hypoallergenic and easy to wash off.
- Brushes and Sponges: A mix of small and medium brushes will help with precision, while sponges are great for blending.
- Stencils (Optional): If you’re not too confident with freehand drawing, stencils can be a lifesaver when it comes to whiskers and other fine details.
- Glitter or Rhinestones (Optional): For a more glamorous look, you can add some sparkles to really make the bunny face pop!
- Makeup Remover Wipes: You’ll want these handy for any touch-ups or mistakes.
Prepare the Face
Before applying any makeup, it’s essential to start with a clean canvas. Just like how a painter preps their materials, your child’s face needs to be cleansed and moisturized. Skipping this step can lead to patchy makeup or irritated skin, so it’s best to take a few extra minutes to do it right.
Here’s a quick breakdown:
- Cleanse the Face: Use a gentle, child-friendly cleanser to remove any dirt or oils from your child’s skin. This will help the makeup stick better and last longer.
- Moisturize: Apply a lightweight, fragrance-free moisturizer. This not only hydrates the skin but also creates a barrier, making it easier to remove the makeup later.
- Apply a Primer (Optional): If you want the makeup to last for hours — say, for a long party or event — a little bit of primer can go a long way in keeping everything in place.
Create the Bunny Nose
Now that the face is all prepped, it’s time to get into the creative part! The bunny nose is one of the most recognizable elements of this makeup look, and it’s super easy to create. Here’s how to nail it, step-by-step:
- Pick the Right Color: Traditionally, a pink nose is ideal for a cute bunny look, but you can get creative depending on the event. White or even a glittery shade can work for something more festive, like an Easter celebration.
- Use a Small Brush: Dip a small, fine-tip brush into your face paint or makeup. Start by making a small oval or triangle shape on the tip of the child’s nose. The size should fit comfortably between their nostrils, not too big but still noticeable.
- Fill It In: Once you have the outline, fill it in with the same color, making sure the edges are smooth and well-defined.
- Add Highlights: If you’re feeling fancy, take a tiny amount of white paint and dab it gently in the center of the nose to give it a 3D effect. This adds a touch of realism, making the nose look more prominent.
Pro tip: If your child isn’t used to wearing makeup, try getting them to scrunch their nose while you apply. It makes the process fun and keeps them engaged!
Add the Bunny Whiskers
What’s a bunny without its whiskers, right? This is where things can get a little tricky, especially for beginners, but don’t worry, I’ve got some foolproof tips to help you out.
- Positioning is Key: Bunny whiskers should come out from the center of the cheeks, so imagine a few lines radiating from the area just next to the nose.
- Use a Thin Brush or Pencil: For the whiskers, you’ll want a really fine-tip brush or even a black eyeliner pencil. The key here is precision — you want the lines to be straight and sharp.
- Draw Thin, Straight Lines: Start from the sides of the nose and flick outwards to create whiskers. Three lines on each side are the standard, but you can add more if you want a fuller look. Keep the strokes light to avoid making the whiskers too thick.
- Optional Stencil: If you’re not confident in your freehand drawing skills, you can use a stencil for the whiskers. Simply position the stencil on the cheek and fill it in with black paint or pencil.
Pro tip: If your child is fidgety, try applying the whiskers in stages. This way, they can take little breaks without you worrying about smudging the paint.
Paint the Bunny Ears
Next up—the bunny ears! Even though they’re typically part of the costume, we’re going to enhance the overall look by painting ears onto the forehead. This makes the whole design more cohesive and complete.
- Mark the Placement: Use a white or light pink eyeliner to mark where the bunny ears will go. You’ll want them just above the eyebrows, stretching upwards toward the hairline.
- Outline the Ears: Using a small brush, outline two long, oval-shaped bunny ears on the forehead. You can make them symmetrical or have one ear flop over for a cuter, more playful look.
- Fill in the Ears: Paint the outer part of the ears white and the inner part soft pink. Blend the colors gently where they meet to give the ears a more natural look.
- Add Details: If you want to go the extra mile, add some shading or fine details like fur around the edges. You can even add a bit of glitter for a sparkly effect that kids will love.
Pro tip: Make sure your child is comfortable with having makeup on their forehead, as this area can be a little sensitive.
Finish with the Bunny Eyes
The eyes are arguably the most crucial feature, as they bring the entire look together. You want to create big, expressive bunny eyes that will make your child’s face pop!
- White Eye Paint: Begin by applying white face paint or eyeliner around the eye area. To make the bunny eyes stand out, go a little bigger than the natural eye shape.
- Add Black Eyeliner: Next, use black eyeliner to outline the eyes. You can either create a simple line around the lash line or go for a more exaggerated look by extending the liner slightly outward, giving the appearance of more enormous, more animated bunny eyes.
- Optional Eyelashes: For an extra cute touch, add a few small, upward flicks above the eyes to represent bunny eyelashes. If you’re working with older children or for a more dramatic look, you could even attach some child-friendly fake eyelashes.
- Finishing Touches: To tie everything together, add a touch of pink or light blush to the eyelids. You can also use a little bit of glitter on the corners of the eyes for some extra sparkle!
Pro tip: If you’re doing this for a party or event, make sure to use makeup that’s safe for children and easy to remove. Some children may be sensitive to specific products, so it’s always best to do a patch test first.
Advanced Tips for a Successful Bunny Makeup Experience
Now that we’ve covered the essential steps for applying bunny makeup let’s discuss how to make the experience enjoyable for both you and your child. Whether you’re a makeup pro or a parent trying this out for the first time, a few tips can go a long way in ensuring everything goes smoothly and, most importantly, remains fun!
1. Keep It Fun and Interactive
Kids love to be involved, and turning this into a shared activity can make the process a lot more enjoyable. You can let them pick the colors for certain parts of the design or give them a small brush to play with while you work on their faces. Engaging them with little stories—like pretending they’re about to become the Easter Bunny—helps keep them excited and focused.
2. Make Sure to Take Breaks
Doing detailed makeup on a child can be a bit tricky, especially if they get fidgety. To keep things moving smoothly, break the process down into shorter steps. Apply the makeup in sections, allowing them time to stretch or move around after each part. This ensures that they don’t get too restless, and it gives you a moment to perfect each detail without rushing.
3. Use Safe, Non-Toxic Products
When it comes to kids, safety is the number one priority. Always make sure you’re using face paints or makeup that is specifically designed for children. These products are usually hypoallergenic and easy to wash off with water. Avoid using regular makeup, as it can contain chemicals that are harsh on young skin.
Pro tip: If your child has sensitive skin, do a patch test the day before to check for any allergic reactions.
4. Ensure a Comfortable Environment
Children tend to move a lot, so creating a calm, comfortable space can be a game changer. Set them up in a soft chair and have some of their favorite toys or books nearby to keep them occupied. You can also play some calming music in the background or even let them watch a show while you work on the makeup.
5. Be Patient and Positive
This is a big one! Applying makeup to a squirmy kid can be a bit of a challenge, but staying calm and encouraging them throughout the process will help keep them relaxed. If something goes wrong—like a whisker being smudged—don’t panic. Simply wipe it off and start again. Kids pick up on your energy, so the more relaxed and positive you are, the better the experience will be for both of you.
6. Have Makeup Remover Ready
It’s just as important to have a plan for when the makeup comes off! Use gentle makeup wipes or a soft cloth with mild soap and water to remove the bunny face paint at the end of the day. Avoid using harsh scrubbing motions, especially around sensitive areas like the eyes. Teaching your child how easy it is to remove will also help if they’re nervous about wearing makeup for the first time.
7. Practice Makes Perfect
If you’re preparing for a special event, it’s a good idea to do a test run. This will allow you to familiarize yourself with the steps and perfect any details. Plus, it will give your child a chance to get used to the makeup and enjoy wearing it, making the actual event even more fun.
Conclusion
And there you have it! A simple, step-by-step guide on how to do bunny makeup on kids that will leave them looking absolutely adorable for any event. From the bunny nose to the whiskers and expressive eyes, you now have all the tools and tips you need to make the experience fun, safe, and memorable.
Remember, the key to success with any kids’ makeup is to keep it light-hearted and enjoyable. Whether you’re a parent looking to add a creative touch to your child’s Easter or Halloween costume or a professional makeup artist looking for some cute bunny makeup ideas, this guide has everything you need to make it a success.