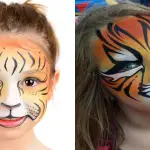
There’s something magical about transforming your child into their favorite animal. Whether for Halloween, a school play, or a fun costume party, creating an elephant face using makeup can be a delightful experience for you and your child. Trust me, I’ve been there! The excitement, giggles, and joy that come with every brushstroke are moments you’ll treasure.
But how do you nail that perfect elephant look? What kind of makeup should you use? And most importantly, how can you make it fun and easy for beginners and seasoned face-painting pros?
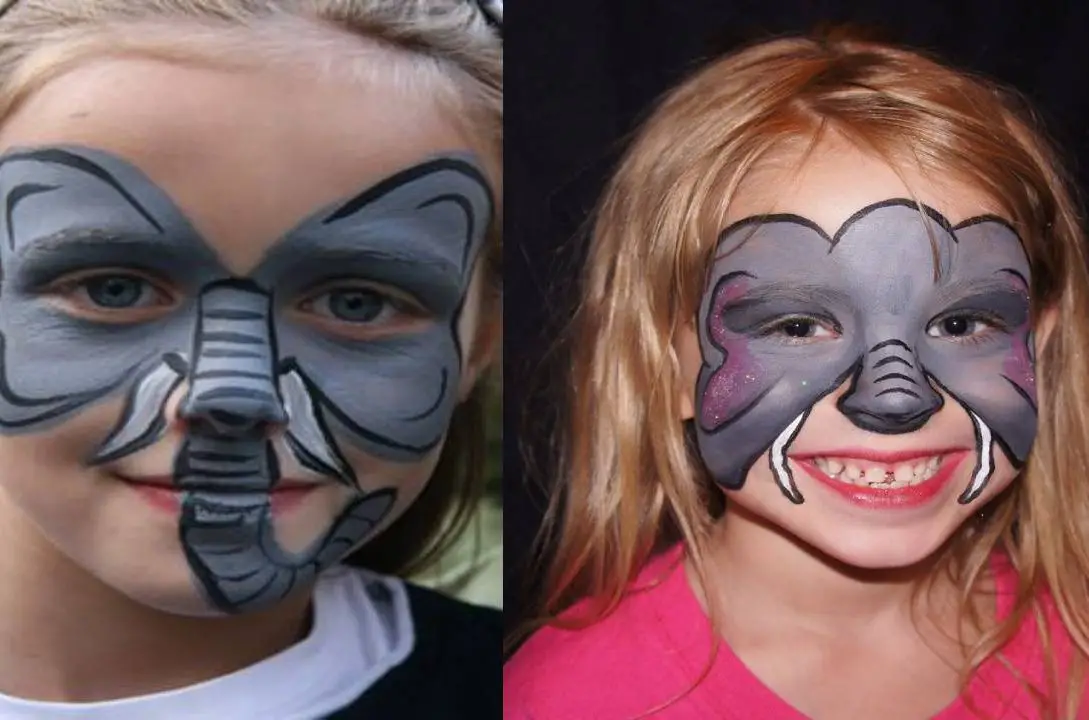
Doing the elephant makeup is really easy. You just need materials like Face paint in white, gray, pink, and black, brushes (flat, round, and detail), and a Sponge.
Once you have the materials, you can use the basic steps below to prepare your mind before we start talking about the main steps.
- Base Coat: Apply a thin layer of white face paint to the child’s face. This will create a clean canvas for the elephant design.
- Body Shape: A flat brush and gray paint outline the elephant’s body. Start with a large oval for the head and body, then add a smaller oval for the trunk.
- Trunk: Use a detail brush to add wrinkles and texture to the trunk.
- Ears: Use a flat brush and gray paint to create large, rounded ears on either side of the head.
- Details:
- Use a detail brush and black paint to add the eyes, mouth, and nostrils.
- Add pink paint to the inside of the ears for a touch of color.
- For a more realistic look, use a sponge to lightly dab gray paint around the edges of the ears and trunk.
- Finishing Touches: Add additional details, such as tusks or glitter, to complete the elephant look.
As you have become familiar with the basic steps, it’s not time for us to cover everything you need to know about how to do elephant makeup on kids.
Gathering All Your Supplies Needed
Before you pick up a brush, you need to gather the right materials. Trust me, having everything at hand makes the process a whole lot smoother.
To get started, here’s a list of makeup products and tools you’ll need for easy elephant makeup for kids:
- Face paint: Stick to safe, non-toxic, and hypoallergenic face paints, especially since kids’ skin is more sensitive. You’ll need shades like gray, white, black, and pink.
- Brushes and sponges: Use a combination of small brushes for details like the eyes and tusks and more enormous sponges to create the base coat.
- Makeup wipes or cotton pads will help correct mistakes and make cleanup easier.
- Water cup: Keep water handy to rinse between colors.
- Glitter (optional): Add glitter for that extra sparkle. Just be sure it’s safe for face painting!
- Stickers or small accessories: If your child wants to go all out, you can add fun stickers or accessories like faux tusks.
Once you have everything ready, you’re halfway there! Now, let’s dive into the real fun: applying the makeup.
Prepare the Kid’s Face
Before applying makeup, it is essential to start with a clean canvas. Prepping the skin ensures the face paint sticks well and looks smooth. Plus, it helps avoid any skin irritation for your child.
- Wash the Face: Gently wash your child’s face with a mild cleanser or water. This removes any oils or dirt that could affect how the paint adheres.
- Dry Thoroughly: Pat the face dry with a clean towel. Ensure there’s no moisture left on the skin, as this can cause the makeup to smudge.
- Apply Moisturizer (Optional): If your child has dry or sensitive skin, you can apply a lightweight, unscented moisturizer. This creates a barrier between the skin and the makeup, making it easier to remove later.
- Use a Primer (Optional): For those looking to keep the makeup in place for a longer time (such as for a party or school event), you can apply a kid-friendly face primer to help the paint last longer.
Now that your child’s face is clean and ready let’s move on to the next exciting step—creating the elephant’s signature look!
Creating the Detailed Trunk
Ah, the trunk is the defining feature that makes the elephant’s makeup come to life. It’s a fun and interactive part of the process that will excite your child.
- Start with a Gray Base: Using a sponge or a broad brush, apply gray face paint over the entire face, leaving the area under the nose bare for now. This gray base will represent the elephant’s skin, so ensure it’s even.
- Draw the Trunk Outline: With a small detail brush and black face paint, draw a long, curved line from the tip of the nose down to the chin. This line should mimic the natural shape of an elephant’s trunk. You can get creative here—if you want a more animated or cartoonish look, make the trunk slightly exaggerated with wavy lines.
- Add Details to the Trunk: Once the outline is in place, fill in the inside of the trunk with the same gray paint used for the base. Then, using black or dark gray, draw subtle horizontal lines across the trunk to mimic its texture. You can even add a few small wrinkles at the nose’s base and the bottom of the chin to make it look realistic.
- Highlight with White: To make the trunk pop, use a thin brush and white face paint to create highlights along the sides of the trunk. This gives the illusion of light reflecting off the skin, making the trunk appear more three-dimensional.
Now that you’ve sorted the trunk, it’s time to tackle the elephant’s big, floppy ears.
Paint the Ears Area
Now that the trunk is in place, it’s time to focus on one of the most distinctive features of an elephant—the large, floppy ears. Painting the ears will bring the makeup to life and give it that iconic elephant look. Kids love this part because it starts to look like an elephant at this stage!
- Choose the Placement: Elephant ears are significant, but we’ll keep things simple by painting them on the sides of the face. Start by identifying the areas above and slightly to the side of the cheeks. You want the ears to be large and wide so they’ll extend from the top of the cheekbones to the sides of the head, near the temples.
- Outline the Ears: Using a small brush and black face paint, carefully outline two large, semi-circular shapes on each side of the face. These shapes will represent the ears. Don’t worry about making the lines perfectly symmetrical; a slight variation can add to the charm!
- Fill in with Gray Paint: Once you’ve outlined the ears, it’s time to fill them in. Use a sponge or medium-sized brush to apply gray face paint to your drawn outlines. Just like with the trunk, make sure the paint is smooth and even. This will make the ears stand out beautifully.
- Add Pink to the Inside: Most elephants have a slightly lighter shade of skin inside their ears, which adds a nice touch of realism. To replicate this, mix a little white with some pink face paint (or use a pale pink directly). Lightly brush this color in the center of the ears, leaving the edges gray. Blend the two colors gently where they meet, so it looks natural and not too stark.
- Define with Shading: For a more realistic effect, use a bit of black or dark gray to add some shading along the outer edges of the ears. This creates a shadow effect, giving the ears more depth and dimension.
- Optional Fun Twist: If your child wants a cuter, cartoonish look, add extra details like glitter along the edges of the ears or even a little blue or purple for a playful, fantasy-inspired elephant.
With the ears in place, your child is already starting to look like a mini-elephant! Now, let’s move on to one of the most expressive parts of the face—the eyes and tusks.
Add The Eyes and Tusks
Now that the trunk and ears are done, it’s time to bring out the finer details—specifically, the eyes and tusks. These elements pull the whole elephant makeup together, giving it that final touch of realism or a playful, cartoonish flair, depending on the style you’re going for.
Paint the Eyes:
- Highlight the Eyes: First, gently apply a thin layer of white face paint around the eyelids using a small brush. This will make the eyes pop and create a striking contrast with the gray skin. Be sure to avoid getting any paint inside the eyes, and let your child keep their eyes closed during this step to make it easier.
- Create Elephant-Inspired Eye Shape: For a more playful, animated elephant, you can use black face paint to outline the eyes in an exaggerated oval or almond shape, similar to how cartoon elephants are often depicted. Extend the shape slightly beyond the outer corners of the eyes, following the natural curve.
- Add Depth with Shading: Using dark gray or black, lightly shade the area around the eyes, creating a shadow effect. This will help give the elephant face more depth and character, making the eyes stand out even more against the lighter areas.
- Optional Eyelashes: For an extra cute touch, especially if the makeup is for a little girl, you can add some whimsical, long eyelashes using a fine brush and black face paint. Draw them along the upper and lower eyelids for a fun, almost cartoon-like effect.
Add the Tusks:
- Draw the Tusks Outline: With a fine brush and white face paint, draw two small, curved tusks starting from the outer edges of the bottom lip and extending just past the chin. These tusks should look like they’re growing from the elephant’s mouth.
- Fill in with White: Once the tusk outlines are complete, fill them with white face paint to give them that bold, ivory look. You can also add a slight curve to the shape, making it look more dynamic and true to life.
- Define with Black: Add a thin line of black or gray paint along one side of each tusk to make the tusks pop. This adds dimension and makes the tusks look more dimensional as if they’re jutting from the face.
- Highlight for Realism: Add a few subtle highlights with white face paint along the top or outer curve of the tusks to give the impression of light reflecting off the surface. It’s a simple step but adds a lot of visual impact.
Finishing The Main Touches
Now that you’ve completed the core elements of the elephant face—the trunk, ears, eyes, and tusks—it’s time to add some finishing touches that will make your child’s elephant look truly stand out. These extra details enhance the overall appearance and give you a chance to get creative and add personal flair.
Add Wrinkles and Texture:
Elephants are known for their thick, wrinkled skin, so why not add a few subtle wrinkles to bring the look to life? Here’s how:
- Draw Wrinkles Around the Trunk: Draw a few curved lines around the trunk using a fine brush and some dark gray or black face paint. Focus primarily on areas where the trunk bends or curves, such as around the nose and mouth. These lines don’t need to be perfect—elephant skin is naturally textured and rough, so the more organic they look, the better!
- Add Wrinkles Around the Eyes: You can also add a couple of tiny lines around the outer corners of the eyes to mimic the natural creases that form when elephants squint. This will give the elephant a more aged or wise appearance.
- Blend for Subtlety: Once you’ve drawn the wrinkles, gently blend the lines into the gray base with a small sponge or your finger. This will soften them, making them look like natural skin folds rather than harsh lines.
Optional Sparkle:
If your child wants something extra fun and festive, why not add a bit of sparkle?
- Glitter Accents: Lightly dab some silver or iridescent glitter around the cheeks, ears, or even along the trunk for a touch of magic. Make sure to use skin-safe glitter that is specifically designed for face painting. The sparkle will catch the light and shimmer your child’s elephant makeup in photos or under party lights.
- Stick-on Gems or Stickers: Another option is to use small stick-on gems or face stickers to add bling to the look. Place them at the top of the tusks, along the sides of the ears, or near the eyes for a fun, decorative touch.
Personalize the Look:
Depending on your child’s preferences, you can customize the makeup to match their personality or the event’s theme.
- Cute or Fierce Elephant?: If your child wants a prettier, more animated look, you can choose bright, exaggerated colors like pastel pinks or purples around the ears and cheeks. On the other hand, if they prefer a more realistic, fierce elephant look, stick to earthy tones and add more shading and detail to mimic natural elephant skin.
- Accessorize: If you want to go all out, consider adding elephant-themed accessories, such as a pair of elephant ears on a headband or a gray hoodie with stuffed ears. This can be the perfect finishing touch for a party or Halloween costume.
Cleaning Up The Makeup
Once the face painting fun is over, knowing how to remove the makeup safely is essential. Proper cleanup will ensure that your child’s skin stays healthy and cleanuprritation-free, and it’s also an excellent opportunity to teach them about skin care. Here’s how to effectively remove elephant makeup from your child’s face:
Gather Your Supplies
Before you start the cleanup process, make sure you have the following supplcleanuphand:
- Makeup Wipes: Look for gentle, hypoallergenic makeup remover wipes suitable for kids’ sensitive skin.
- Cotton Pads: These can be combined with makeup remover for more stubborn areas.
- Mild Cleanser: If your child’s skin tolerates it, you can use a mild, tear-free facial cleanser to clean the face thoroughly.
- Warm Water: This helps to loosen the makeup and cleanse the skin effectively.
- Towels: Have a soft towel ready to dry the face afterward.
Step-by-Step Cleanup Process
- Start with Makeup Wipes: Use makeup wipes to clean away the bulk of the face paint. Focus on one section at a time—start with the cheeks, then move to the eyes, trunk, and ears. Be gentle around the eyes, as this area is susceptible.
- Use Cotton Pads for Stubborn Areas: If any traces of paint are left, especially around the eyes or mouth, dampen a cotton pad with warm water or makeup remover and gently dab the areas. This should help lift off any remaining makeup.
- Cleanse the Face: After removing most makeup, wash your child’s face with a mild cleanser and warm water. Apply the cleanser using your fingers or a soft cloth, massaging gently to remove residual paint. Rinse thoroughly with warm water.
- Pat Dry: Once the face is clean, gently pat it dry with a soft towel. Avoid rubbing the skin to prevent irritation.
- Moisturize: If your child’s skin feels dry after washing, apply a gentle, child-friendly moisturizer to keep their skin hydrated and happy.
Essential Tips for Safe Removal
- Avoid Harsh Chemicals: Always choose gentle, non-toxic products to remove face paint from your child’s skin. Avoid using products with alcohol or harsh fragrances that can cause irritation.
- Watch for Reactions: After removing the makeup, check your child’s skin for any signs of irritation or an allergic reaction. If you notice redness or discomfort, consult a pediatrician.
- Teach Proper Skin Care: Use this opportunity to educate your child about the importance of skincare. Explain that cleaning their face after wearing makeup is crucial for keeping their skin healthy.
Conclusion
In this comprehensive guide on how to do elephant makeup on kids, we’ve explored every step of the gathering to create a stunning elephant look and safely move forward. Whether you’re preparing for a school event, a Halloween celebration, or just having fun at home, the joy of face painting with your child can create lasting memories and enhance their creative expression.
Face painting is more than just a fun activity; it’s an opportunity to bond with your child, encouraging their imagination while teaching them about art and self-expression. Plus, there’s something gratifying about watching their face light up when they see their transformation in the mirror!
So gather your supplies, unleash your creativity, and enjoy this delightful journey into the world of elephant makeup. Remember, it’s all about having fun and making it a memorable experience for both of you.