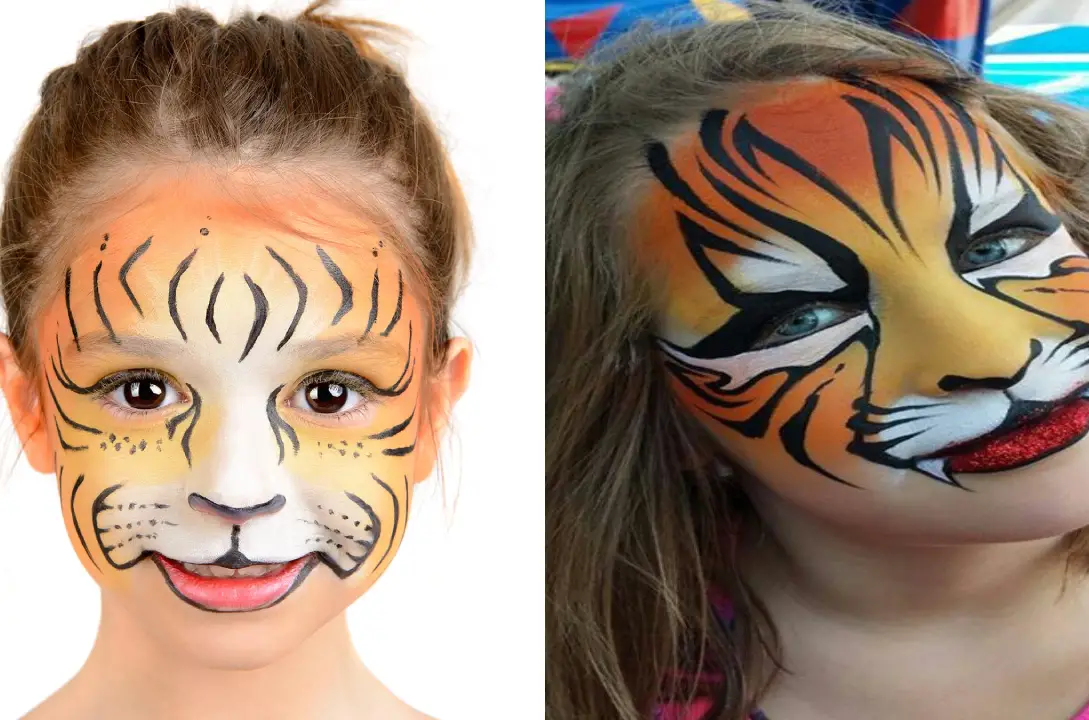
Ever wonder how to bring out the roar in your little one with tiger makeup that’s fun, easy, and perfect for any occasion? Whether it’s for a kids’ party, Halloween, or simply some creative playtime, learning how to do tiger makeup on kids can be both enjoyable and rewarding for you and your child.
The first time I attempted tiger makeup for my kids’s birthday, I had all the right intentions but was worried about getting the stripes wrong or making a mess. It turns out that with the right tips and step-by-step guidance, it’s easier than I thought, and the kids absolutely love it!
The materials you need are Face Paint in yellow, orange, black, and white. a Brushes (flat and round), then Sponge and Water
The main basic steps you should follow are:
- Base Coat: Use a sponge to apply a base coat of yellow or orange to the child’s Face.
- White Stripes: Use a flat brush to paint white stripes across the child’s Face. Start from the forehead and go down towards the chin.
- Black Stripes: Add black stripes between the white ones. These can be curved or straight, depending on how detailed you want the tiger to look.
- Nose and Mouth: Use a round brush to paint a black triangle for the nose and a black line for the mouth.
- Whiskers: Draw three black whiskers on each side of the nose.
- Eyes: Paint black circles around the eyes. Add a white dot in the centre of each eye for the pupil.
- Details: Add more information, such as black spots on the cheeks or forehead, if desired.
As we go deeper into this guide, I’ll walk you through everything you need to know, from materials and preparation to mastering the perfect tiger stripes.
Materials You Need for Tiger Makeup
To create a fantastic tiger makeup look for kids, you’ll need the following items. These are easy to find at most craft stores or online, and they’re kid-friendly, so you don’t have to worry about any harsh chemicals:
- Face Paints: Choose hypoallergenic, water-based face paints. You’ll need orange, white, black, and a touch of yellow. These colours form the base and details of the tiger’s Face. You can also find Face paint kits that include all these colours, which are explicitly designed for kids.
- Brushes and Sponges: For precise lines and smooth coverage, you’ll need a variety of brushes and sponges. A large sponge is excellent for applying the base colours quickly, while small, fine-tipped brushes help with detailed lines and stripes.
- Setting Powder: This helps the makeup last longer, especially if your child will be wearing it for a few hours. Lightly duFaceg the Face with translucent setting powder ensures the makeup doesn’t smudge or melt.
- Water and Towel: You’ll need water to blend and clean brushes between colours. A towel or paper towel will also come in handy for wiping off any mistakes or facing the Face after washing it.
- Glitter (Optional): To add a little sparkle to the tiger’s look, you can use cosmetic-grade glitter. This step is optional but fun, especially if your child wants a magical or glam tiger look.
PreparingFacer Kids Face
Before applying any makeup, preparation is critical. Starting with a clean, dry face will ensure the face paint goes on smoothly and lasts longer. Here’s what I recommend:
- Wash the Face: Use a gentle cleanser to wash your Face. This will remove any dirt or oil that might interfere with the makeuFaceat the Face dry with a clean towel.
- Moisturize: If your child has dry or sensitive skin, apply a light layer of moisturizer. Avoid using anything too greasy, as it could cause the Paint to slip off. Let the moisturizer fully absorb before moving to the next step.
- Hair Prep: If your child has long hair, tie it back or use a headband to keep it out of the way. This will prevent any accidental smudging and ensure you have a clear canvas to work on.
Creating the very Base Color
NoFaceat the Face is prepped; it’s time to create the tiger’s iconic orange base. This is where the transformation truly begins! You’ll want to achieve an even, bold orange tone that sets the stage for the tiger makeup.
- Apply the Orange Base: Using a sponge, dab the orange face paint onto the significant Face of the Face, covering the cheeks, forehead, chin, and nose. Leave the area around the eyes and mouth bare for now (these areas will be white later). If your orange face paint feels too thick, add a little water to the sponge to thin it out. Make sure to blend the edges near the hairline and jawline so it looks smooth and natural.
- Blend in Yellow (Optional): To give the tiger face some dimension, blend a bit of yellow face paint with the orange, focusing on the centre of the forehead, nose, and cheeks. This can add a warm, vibrant look. Faceaking the Face makes it appear more dynamic and lifelike.
- Leave Space for the White: The tiger’s muzzle and areas around the eyes are typically white. Avoid painting these areas with orange at first. If you accidentally get some orange paint where the white will go, you can clean it up with a damp cloth or cotton swab.
- Set the Base: Once the base colour is applied evenly, let it dry for a minute or two. If you’re using setting powder, ligFace dust the Face to lock in the Paint and prevent smudging.
Adding the needed Stripes
Now for the fun part—adding the tiger’s stripes! These are what give the makeup its fierce, yet playful, look. Don’t worry if you’re not a professional—stripes don’t need to be perfect to look amazing.
- Use a Fine-Tipped Brush: Dip a fine-tipped brush into black face paint. Starting at the forehead, begin painting thin, curved lines that taper off at the ends. You can create as many or as few stripes as you like. For a more natural look, vary the thickness of the lines.
- Strategic Placement: Focus on areas where stripes naturally appear on tigers: the forehead, cheeks, and around the faces of the Face. For the cheeks, add a few small, sharp lines extending from the sides of the nose toward the ears. Keep in mind that the stripes should radiate outward like a fan for a classic tiger look.
- Add to the Nose and Chin: Paint a small black triangle on the tip of the nose and extend a line down to the middle of the upper lip. Then, draw a few short stripes along the chin to mirror the pattern on the forehead.
- Let the Paint Dry: Give the black stripes a minute to dry before adding any additional details. This will prevent smudging, especially if your child moves around a lot during the process.
Applying the final Details
Now that the base and stripes are complete, it’s time to add those finishing touches that will bring the tiger face to life. This step involves adding the white areas, enhancing the eyes, and defining the tiger’s muzzle for a complete transformation.
- White Around the Eyes and Muzzle: Use a small brush or sponge to apply white Face Paint around the eyes and mouth carefully. For the eyes, focus on the areas just above and below the eyebrows, as well as directly under the eyes. The white Paint here makes the eyes stand out against the orange and black stripes, giving a more realistic tiger look.
For the muzzle, apply white Paint in a semi-circle around the nose and down to the upper lip, covering the area under the nose and chin. Blend the white into the edges of the orange Paint for a seamless transition. This white muzzle will help give your tiger that classic feline appearance.
- Defining the Nose and Whiskers: Paint a small black triangle or oval shape on the tip of the nose if you haven’t already done this in the stripe step. You can make the nose larger or smaller depending on how dramatic you want the look to be.
Then, use a fine brush to paint a few whisker dots on each side of the white muzzle, just above the upper lip. You can also draw whisker lines extending out from the dots to give the makeup an extra layer of detail.
- Enhancing the Eyes: If you’re going for a more dramatic look (especially for parties or Halloween), you can outline the eyes with black face paint to make them pop. Draw a thick line along the top and bottom eyelids, creating a slightly cat-eye shape. This will make the eyes appear larger and more feline.
For an extra fun touch, you can add glitter or shimmer around the eyes. Just make sure it’s safe for the delicate skin around the eyes, and avoid getting any into your child’s eyes.
- Lip Detail: To finish off, add some black paint to the upper lip, following the line you extended from the nose. You can either fill in the entire upper lip or just outline it for a subtler look. This gives the illusion of a tiger’s snout and the whole Face coming together.
- Optional Glitter and Shimmer: To give the tiger makeup a bit of sparkle, you can apply cosmetic glitter to the forehead, cheeks, or even over the stripes. This is great for kids’ parties or if your child loves a little extra dazzle. Just be sure to use glitter that isFacee for the Face.
Conclusion
Transforming your child into a tiger is not only fun, but it’s also an opportunity to bond and unleash your creative side.
Whether it’s for Halloween, a themed party, or just a playful day at home, learning how to do tiger makeup on kids is a rewarding experience that can be both simple and stunning when done right.
With just a few materials, a little patience, and following these step-by-step instructions, you’ll be able to achieve a tiger look that will have your child roaring with excitement.
One of the best parts about this process is how customizable it can be. You can go for a fierce tiger look with bold stripes and sharp lines or tone it down for a more playful and cartoonish version of a tiger.
If you’re a beginner, don’t worry—each time you practice, your skills will improve, and you’ll find what works best for your style.
The key to successful kids’ makeup is keeping it fun, safe, and creative. Don’t be afraid to experiment with different techniques and colours or even add glitter for a unique twist. And when your little one looks in the mirror and sees their tiger transformation, the smiles and laughter will make it all worth it.
So the next time you’re getting ready for a costume party or just having a fun day of dress-up, Face out those Face paints and create a tiger look that’s as wild and wonderful as your child’s imagination!


