How to Do a Mermaid Makeup for Kids
The mermaid look is a favorite look for kids, especially younger kids. All that shiny and glittery makeup and stuff can create excitement in your kid that’s catching.
This look is also quite common for Halloween and while it looks complicated, it truly isn’t. It’s one look you should have done in a little under fifteen minutes.
If you are on this page, chances are you are considering this look. Before you start, here are some key facts about the mermaid look you should know:
Key Facts:
- There is no one-size-fits-all when it comes to dressing up like a mermaid. Unlike most looks for Halloween, the mermaid look doesn’t have to follow one definite pattern. So long as you use a moderate amount of glittering products and touch the main features, you should be fine.
- The main parts of the face to highlight include the eyes, lips, and upper cheekbones. Some people include the forehead and the chin. However, you’ll be fine if you do just the first few parts of the face.
- The hair is another key feature of the mermaid look and you are better off wearing it down, preferably with a crown in place.
Essential Makeup Items for the Makeup Look
- Powder
- Foundation (optional)
- Emerald green or turquoise eye shadow
- Black eyeliner
- Black mascara (optional)
- Lipstick (your regular color)
- Black eye pencils
- Green blush
Other Essential Items Needed
- Stars (for the hair. You could opt for a half crown or any other fancy hair jewelry)
Getting Started
- Most people skip the use of foundation for kids or use sparingly. If using, apply a moderate amount to the face and blend until smooth. A foundation helps set and accentuate the powder so it does have its benefits.
- Next, apply a moderate amount of powder all over the face until smooth.
- Next, work on the eyes. This stage will take a whole lot of time. You want the eyes to “speak” and will be using a few items here.
You want to start with the brows. Using the eye pencils, highlight them as you would usually, making sure they appear natural and to your liking.
Next, apply the green or turquoise eyeshadow to the entire eyelids. Take the time to blend this in and when done, you should have glittering eyes already.
- You want to accentuate the eyes further by working on the lashes next, You can go light or heavy on this; the choice is yours. If you want a really bold, pronounced look, then use black mascara, otherwise opt for the colorless alternative.
The idea is to get your lashes up and in place and you should achieve this with one or two sweeps of the mascara.
- The eyeliner is next. Run this from one end of your lid to the next and leave to dry.
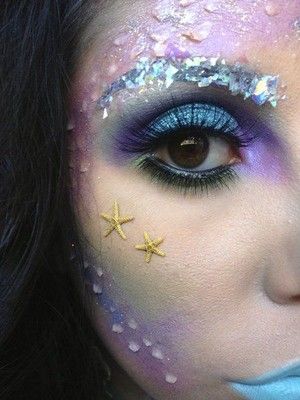
- Now comes more glimmer. Apply glitters under your lower eyelids and spread this in a semi circle towards your forehead.
- For your cheeks, apply the green or turquoise blush to the upper cheek. You can purchase this on Amazon or from your favorite local store.
Using a blush brush, apply this using light upward strokes and blend until well blended. I should mention here that you should apply this blush to one part of your face and the eye glitter to the other,
You don’t want to apply blush to both cheeks or the eye glitter to both eyes or you could end up with too much shimmer which would present with a tacky look.
In the world of makeup and beauty, less is always more, especially when bright colors are in play.
-The last and final part of this look is the lip. Apply your favorite lipstick and you are done. If you are confused about the best shade to go for, always remember you can do no wrong with pastel pink, especially if you are on the fair side. For a darker skin tone, a slightly darker hue will work just fine to achieve the same result.
- For the hair, some people color their hair green or at the very least, add some green highlights. But you’ll be fine just wearing it down with a crown or any hair accessory in place,

Going for a Glamorous Mermaid Look
If you want your mermaid look bold and really glamorous, then you would need to follow a few extra steps, Also, some steps that are overlooked during the light mermaid look would definitely have to be followed here.
Getting Started.
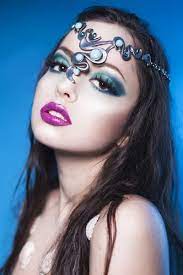
- Your brows and lashes would follow the regular pattern. The variation in looks would start with the eyeshadow. While you would ordinarily just apply the eyeshadow color of choice to just your eyelids, for this other look, you would be extending it to your upper lids all the way to your brows.
You also want to apply a generous amount of it so it appears bold without it running over. You also should go a step further and apply some dull champagne gold glitters to just your eyelids.
- For your lashes, there is just the choice of black mascara and you want to be generous with the application here.
- Your lipstick should also be in turquoise; the exact shade as your eyeshadow.
- If you are artistic, you could include a painting of scales drawn using a darker shade of turquoise. Draw this around your eye region, extending this to just the middle of your cheek, or you could just opt to have a smaller of this painting on your forehead.
- For the hair, again changing your hair color or adding turquoise highlights is also not a must, however, for this glamorous look, it does come strongly recommended.
Having a matching hair color has a way of adding that perfect finish to your look with very minimal effort. A crown made of stars or just a regular crown will cinch your look and is the last step to take.
Conclusion
Your mermaid look is ready. Whichever of the looks you decide to go for, remember the idea is to have fun dressing up and also have a good time at your event.